Buffing hardwood floors can feel confusing if you have never done it before. I have been there too.
This guide covers everything you need to know to get clean, smooth results without damaging your floors.
We will go over how to move the buffer correctly, work with the grain, test products safely, and apply finish the right way.
I have spent years working with hardwood floors, and I know what works and what does not.
Let's keep it simple and get your floors looking great.
What Does Buffing a Hardwood Floor Mean?

Buffing a hardwood floor is a simple process that smooths the surface and brings back its natural shine over time.
A buffer machine spins a soft pad across the floor to smooth out minor scratches, scuffs, and dull spots. It works on the finish on top of the wood, not the wood itself.
When a fresh coat of finish is added right after buffing, it is called "screen and recoat." This refreshes the floor without stripping it down to bare wood.
Buffing works best on floors in good condition. Deep scratches or heavy stains will need a full refinishing job.
Tools and Supplies Needed to Buff Hardwood Floors

Get the right tools and supplies before starting. It saves time and protects your floors from damage.
Choosing the Right Floor Buffer
Two main buffer types exist: rotary and orbital.
A rotary buffer spins in one direction and works for deep buffing. An orbital buffer moves in small circles and is gentler on wood. For most homeowners, orbital is the better pick. It is easier to handle and reduces the risk of swirl marks.
Rent one from a hardware store if you buff floors once or twice a year. Buy one if you have large floor areas. Always use a lower speed setting on finished hardwood to avoid heat damage.
Best Buffing Pads and Grit Levels
Stick to screen pads between 120 and 220 grit for hardwood floors.
Use 120-grit to remove light scratches. Use 180 or 220-grit before applying a new finish coat. White synthetic pads work well for polish or wax.
Red pads offer slightly more scrubbing power. Never use coarse pads as they scratch deeply. Replace pads once they look worn or clogged.
Hardwood Floor Cleaners and Safety Gear
Use a pH-neutral cleaner made for hardwood. Skip anything with ammonia or bleach. Apply cleaner lightly and avoid excess moisture to prevent warping.
For safety, wear a dust mask, safety glasses, and knee pads. Keep windows open and run a fan for good airflow while working.
How to Prepare Hardwood Floors Before Buffing?

Good preparation makes buffing more effective and helps your floors look their best after the job is done.
Remove Furniture and Rugs
Clear the room completely before you start. Move all furniture, chairs, and tables out of the space. Roll up rugs and take them to another room.
This gives you open space to work and protects your belongings from dust.
Clean Dust and Dirt Properly
Sweep the floor from one end to the other using a soft-bristle broom or dry dust mop. Follow up with a vacuum, paying close attention to corners and gaps between boards.
Finish with a damp mop using a wood-safe cleaner. Let the floor dry fully before buffing.
Repair Minor Scratches and Scuffs
Look over the entire floor carefully before you begin. Use a wood filler or a hardwood floor repair marker that matches your floor color. Apply it to damaged spots and let it dry completely.
Buffing over unrepaired areas can make them more visible, so take care of them first.
Step-by-Step Guide to Buff Hardwood Floors for Beginners
Buffing hardwood floors brings back their shine and keeps them looking fresh. This guide walks you through each step clearly and simply.
Step 1 – Set Up the Floor Buffer

Clear the room and sweep the floor before you start. Check that the buffing pad is clean and firmly attached to the machine.
Do a quick test run in a small area to get comfortable with the buffer before moving to the full floor.
Step 2 – Buff the Floor in Small Sections

Start from one corner and work your way toward the door. Keep the buffer moving at all times. Holding it in one spot too long can damage the wood.
Work at a slow, steady pace for the best results.
Step 3 – Use Overlapping Passes for Even Results

Each pass should slightly overlap the last one. This covers the floor evenly and blends any light or dark spots. The finish looks smoother and more consistent when you follow this pattern.
Step 4 – Buff Corners and Edges Carefully
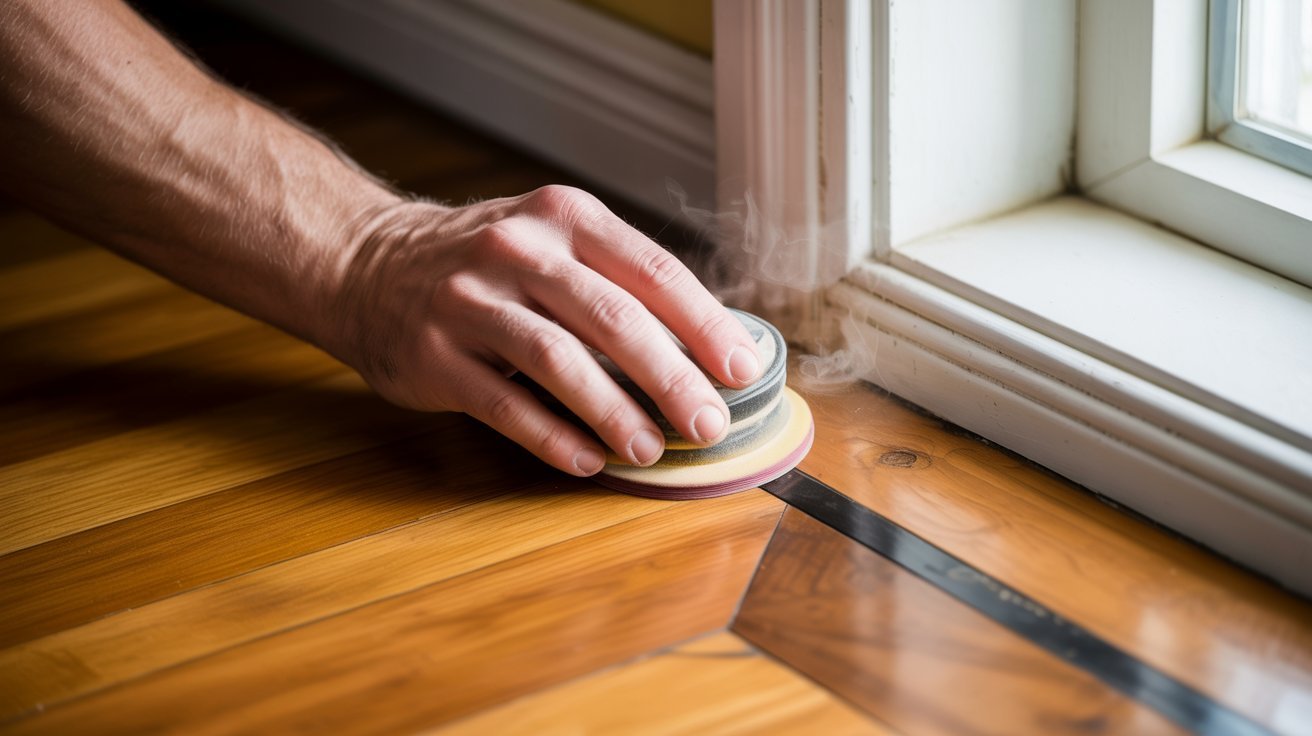
Switch to a hand-held pad for tight corners and edges. Use short, back-and-forth motions with light pressure.
Do not skip these areas, as unfinished edges can make the whole floor look uneven.
Step 5 – Vacuum Dust and Wipe the Floor

Vacuum the floor with a soft brush attachment after buffing. Follow up with a dry microfiber mop to remove leftover dust. Skip the wet mop, as moisture can damage the wood surface.
Step 6 – Apply a Fresh Protective Finish

Pick a finish that matches your existing floor type. Spread it in long, even strokes using a long-handled applicator.
Let each coat dry fully before applying the next one. Keep the room ventilated during this step.
Common Hardwood Floor Buffing Mistakes to Avoid

Small buffing mistakes can leave your hardwood floors looking dull and damaged instead of clean and polished.
Leaving the Buffer in One Spot
Never let the buffer sit still while it is running. Holding it in one place burns the wood and creates uneven marks. Keep it moving in slow, straight passes at all times.
Using the Wrong Buffing Pad
A pad that is too coarse will scratch the surface. One that is too soft will not work at all. Check the pad rating before you start and match it to the job you are doing.
Applying Too Much Finish
Thick coats bubble, crack, and take too long to dry. Apply two or three thin coats instead. This gives a cleaner result and helps the finish bond properly to the wood.
Skipping Proper Cleaning Before Buffing
Buffing over dirt and dust causes deep scratches. Always sweep first, then go over the floor with a damp microfiber mop. Let it dry fully before you start buffing.
A little extra prep time up front saves you from redoing the whole job later.
How to Maintain Hardwood Floors After Buffing

Keeping hardwood floors in great shape after buffing is simple with the right care and a steady routine.
Best Cleaning Routine for Hardwood Floors
After buffing, start by dry mopping or sweeping daily. Dust and dirt scratch the surface over time if left sitting too long. A microfiber mop works best as it picks up fine dust that a broom often misses.
Once a week, use a damp mop with a hardwood floor cleaner. Make sure the mop is only slightly wet. Too much water can cause warping or swelling over time.
Avoid vinegar, bleach, or all-purpose sprays as these strip the finish and dull the surface. Always stick to cleaners made specifically for hardwood floors.
How Often to Buff Hardwood Floors
For most homes, buffing once or twice a year is enough. Doing it too often wears down the finish faster than normal use would. Check the floor in natural light and if it looks flat or worn, it is time for a buff.
High-traffic areas like hallways and kitchens may lose their shine sooner. If you have pets or kids, plan to buff a little more often. Always wait at least 24 hours after buffing before placing furniture back.
Tips for Buffing Hardwood Floors Like a Pro
Buffing hardwood floors takes the right approach. These simple tips help you get smooth, clean results every time.
- Always keep the buffer moving in a steady, controlled motion. Never let it sit still while running as it can burn or damage the wood surface.
- Move the buffer in the same direction as the wood grain. Buffing against the grain leaves small scratches that are hard to fix once the finish dries.
- Test any product on a small hidden spot before applying it to the whole floor. Wait for it to dry and check the result first.
- Apply thin coats of finish instead of one thick coat. Thin coats dry faster, bond better, and leave a cleaner look on the surface.
- Let each coat dry fully before adding another. Two or three thin coats will always give better results than one heavy application.
Conclusion
Buffing hardwood floors can feel tricky at first, but once you get the hang of it, the results are really satisfying. I remember the first time I tried it, I pressed too hard and moved too slow.
The floor looked worse before it looked better. But with a little patience, it all came together. You will get there too.
Try these tips on your next project and see the difference for yourself. Got questions or a story to share? Drop a comment below!
Frequently Asked Questions
What is the best speed setting to use when buffing hardwood floors?
A lower speed setting works best for most hardwood floors. It gives you more control and reduces the risk of scratching or burning the surface.
How often should hardwood floors be buffed?
Most hardwood floors benefit from buffing once every one to two years. High-traffic areas may need it more often to keep the finish looking fresh.
Can I buff hardwood floors without a professional machine?
Yes, smaller handheld buffers are available for home use and work well for basic maintenance. For larger areas, renting a full-size floor buffer is a more practical option.
What should I do if the finish looks streaky after buffing?
A streaky finish usually means the coat was applied too thick or the floor was not cleaned properly before buffing. Lightly buff the area again and apply a thin, even coat of finish to fix it.
Is it safe to buff floors that have deep scratches or gouges?
Buffing works best on light surface scratches and dull finishes. Deep scratches or gouges need to be sanded and refinished before buffing will give you good results.